
To run a your own production you are required to know the following information:
1. TYPES OF LIGHT:
lighting instruments group into families and it is convenient to consider our requirements in terms of what each family offers in terms of beam size, beam shape, and beam quality.
Floods
The beam size, shape and quality emitted by a flood is fixed: there are no adjusting knobs. The light is therefore suitable for lighting skies and cloths. It is not selective enough for lighting actors. Strand Lightings Coda units may be single or grouped in 3s or 4s for colour mixing. They have a reflector that is specially designed to ensure an even wash over a large area from a short throw.


Prism Convex (PC) spots
Profile Spots
Profile spots give precise control of the beam. An iris diaphragm (for round edges) and shutters (for hard edges) can produce shapes in all sizes. For more complex shapes, special masks can be cut. Edge quality can be adjusted from very soft to very hard by moving the lens,while a metal pattern plate called a gobo can texture the quality of the whole beam. The number in the profile’s name indicates the beam angle.

Whereas standard profile spots have a fixed beam angle, which is narrowed by shuttering, variable beam profiles use a pair of lenses whose differential movement gives a wide range of beam angles and edge qualities. The shutters are then only required for shaping. Adjustments are faster and more efficient use is made of the lamp’s output.The number in a variable profile’s name indicates the range of available angles. The SL New Generation Profile Spots, from Strand Lighting, now provide increased light output with reduced power consumption. Often referred to as a “coolbeam” profile, they do this by using state of the art optical coating on a glass reflector, allowing the optical light to be passed forward,while the heat and infra red spectrum is allowed out of the rear.

The SL New Generation Profile Spot
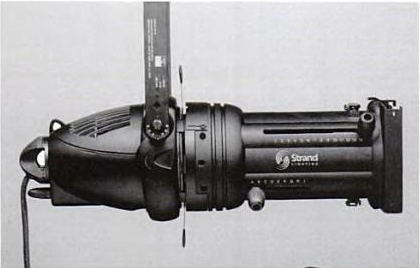
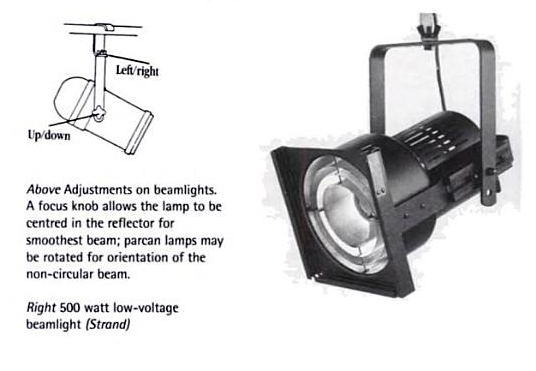
Beamlights
Most lighting instruments produce a conical beam so that the spread widens as the throw increases. Beamlights use a parabolic reflector (and no lens) to produce a near parallel beam which is more intense than a lens spotlight of the same wattage. This is one of the more important developments of the past decade. The optics are fully contained within the glass envelope of the lamp. Various Lamps providing angles of a squashed near-parallel beam are available. The intensity produces a depth-enhancing haze in the air, so intense that it is effective even with deep colours. The basis of most rock lighting today.
2. CHOOSING LIGHTING POSITIONS
A. Lighting from the front:
Consider the effect of a light starting as a vertical downlight on an actor then moving in a frontal plane until its beam becomes horizontal and then carries on to light from below. How visible will be the actor’s face, particularly eyes and teeth? To what extent will face and body be modelled or flattened? What area of stage will be selected and what will be the size and direction of shadows cast on floor and scenery?

A vertical beam is the most selective light possible. The lit area of stage, and the shadow cast upon it, need be no wider than the widest part of the actor. However, the actor’s eyes will be black pools and a highlighted nose will shade the mouth.

If the light comes from a little forward of the actor, it will start to reach the eyes and mouth (provided that she keeps her chin up and is not defeated by a hat brim!). However, the lit area, and shadow cast, starts to extend upstage from the actor – i.e. the light is slightly less selective.

As the lighting comes increasingly from the front, the actor’s eyes and teeth receive more light. But the area lit extends further and further upstage, reducing the selectivity and increasing the likelihood of the actor’s shadow hitting the scenery.

As the light becomes more and more frontal, the actor’s features become flattened (and so also does three dimensional scenery). The lit area and the actor’s shadows increase until, when the light is horizontal, there is a lit corridor for the entire depth of the stage, and the actor shadows become actor length.

Light from below projects an actor shadow that looms above the actor rising and falling as she moves towards and away from the light source. When this is the only lighting angle, the effect on the face is not at all natural. But a little from below, usually just reflected light can help to soften the harshness of light from above.
B. Lighting from the back and side:
Now consider a light from behind. Then a light or lights from a series of side angles (i.e. lights at right angles to those considered above). Once again the criteria is visibility, modelling, selectivity and shadows.

A light source behind the actor does not illuminate the face, but it helps to give depth to the stage by separating the action from the scenery through creating a haze and highlighting head and shoulders. The shadow of the actor is cast forward, helping the selection of areas. Since the light does not fall on the face, strong colours can be used.

If the light comes from a little to one side of the actor it will start to reach the eyes and mouth on that side. The area lit, and the shadows cast, will extend along the stage floor on the other side.

Add a second light source from the other side, and both sides of the face will receive light. However, there is now a second shadow and the selected area of stage floor extends to both sides of the actor.

As the side lighting comes from an increasingly lower angle, the shadows will lengthen to both sides of the actor and a larger corridor will be selected across the stage. As the light hits the face from a lower angle, it will light more into the eyes and teeth, although there will still be a tendency towards a central dark line where the beams meet down the centre of the face.

As the angle lowers, sidelight has an increasingly modelling effect on the actor’s face and body. This is particularly important in dance. When the light becomes horizontal there will be a lighting corridor across the whole stage. By focusing just clear of the floor, it is possible to lose shadows into the wings, and the light will only be apparent when an actor stands in it.
C. Finding the compromise:
We normally seek to light an actor for maximum visibility and maximum modelling, with minimum shadow. Additionally in many productions, we need to select as tight an area as possible. Which combination of angles offers the optimum compromise?

The basic compromise that has long been the standard approach is a pair of beams crossing on to the actor (one for each side of the face) from positions that are both forward and to the side of the actor. The suggested angle is often around 45 degrees in both directions – i.e. midway between vertical and horizontal and midway between front and side. However to restrict the shadows cast and to give a better ‘join’, the lights are often positioned closer to the vertical and to the centre.

A backlight added to the basic crossed pair brings depth to the scene and generally enhances the ‘look’ of the actor. The backlight can be used for strong atmospheric colour if required, while the crossed pair maintain a more natural tint on the actor’s skin tones. Note: The actor is now It by three beams with a 120° separation between them.

The problem with ‘crossed pair’ lighting (with or without a backlight) is the extent of the spread of light on floor and scenery beyond the area where the actor’s head is lit (remember that head is usually about five feet above the floor). Although a single beam can be flat it can also be quite tight.

Adding a backlight can enhance this flatness quite considerably – and the selectivity is still a tightly controlled upstage/downstage corridor without side spillage.

For modelling, sidelights can be added and, although they will spread the lit area, they can be at quite steep angles since they do not need to make a major contribution to visibility. Note: Four beams now light the actor with a 90° separation between them.
3. THE STAGE LIGHTING RIG:
The major proportion of a stage lighting rig is focused to form a palette of areas and colours whose various combinations will provide the desired fluidity of selectivity and atmosphere. However there are certain lights whose function is so ‘special’ that they cannot make a significant contribution when mixing the basic palette.


A. For the Actor:
Specials usually consist of spotlights set so tightly that the spaces they light cannot be considered as areas. They are often for moments when an actor has to be picked’ out (perhaps only head and shoulders) on an otherwise blacked-out stage. They need to be listed in a priority order for close scrutiny and reduction to essentials.
B. For Special Effects:
There may be a request for equipment to produce clouds, flames, water, lightning, etc. When listing it is always prudent to remember that such effects can draw attention away from the actor rather than positively support a performance. And if the effect is essential, then the effect of light reflected from fire or water is often more telling than a pictorial representation of the actual fire or water
C. For the Scenery:
The proportion of the rig focused on the scenery will be very small. With the exception of skies and back or front cloths, scenery normally gets sufficient general wash from the reflected light bouncing off the stage floor from the lights that have been set for the actors. Indeed, as discussed in the following pages, many of the basic problems of lighting design arise from difficulties in stopping actor light hitting directly on the scenery Successful lighting of scenery depends on augmenting the diffuse reflected general light by selective highlighting of chosen scenic elements, or parts of these elements. This can vary from bold gashes to soft emphasis. Again, to be listed and reduced to essentials after a debate based on priorities and available resources.
4. DIVIDING THE STAGE
A. Dividing by Area:
Once decisions have been made about the kind of contribution that we expect lighting to make to the production that we are planning – and these contributions have been put into some sort of order of priority – we need to break down the stage area into the segments over which we require independent selective control. The required breakdown may be symmetrical, in which case the stage plan will be divided into something that resembles a series of areas of different sizes corresponding to the placing of the action. Of course it could well be that there is no need for division into what it is useful to call production areas: all the stage may be in use all the time. In this case a simple division into centre and sides will allow balancing for maximum ‘enhancement’ of the look of the scene. Note: Adjoining areas overlap – both side to side and back to front. And remember to remember that these are areas where an actor’s head is to be lit – they are unlikely to be the same as the light patterns on the floor.

B. Area planning for a play:
In this naturalistic play -possibly but not necessarily in a box set -the areas are determined to a considerable extent by the positions of furniture and doors. And the lighting is expected to make some logic in terms of practical light fittings (table lamps, wall brackets, etc.) and the natural sunshine and moonlight coming through windows (including those in the audience’s ‘fourth wall’). In this particular example, we have a play where it is desirable to focus attention at various times on the sofa, the armchair, the table (with that essential tool of modern drama, a telephone) and the doors. These doors are tremendously important in any drama: some of the key appearances and speeches are made there. But for a long intimate scene on the sofa, it is useful to concentrate on that sofa and loose peripheral areas like the doors. Consider the seven areas shown here in terms of possible combinations: the area palette gives the director a wide range of selectivity of audience vision – whether a subconscious fluidity (slow cues that are not obvious) or an area selection obviously linked to the switching of the practical lamps

Area planning for a musical Musicals tend to have many scenes and many selective and atmospheric light changes within these scenes. Therefore, unless there are many – very many – lights available, the breakdown into areas has to be very general. In this example the breakdown is symmetrical because, as in so many musical productions, the settings consist of a symmetrical series of wings leading to a backcloth, possibly a skycloth. With the addition of cloths and scenic pieces, the method of staging gives a flexible masked acting area with the possibility of sufficient open space for dancing and lots of entrances for a large chorus to get on and off quickly In most musicals the big moments are staged in the downstage areas: to help both musical balance and the ‘putting across’ of numbers to the audience. For the same reasons, much of the essential action takes place centre stage. The most common selective lighting cue is to ‘concentrate centre’, usually downstage centre, by ‘losing the edges’. This suggests a minimum of three areas across the stage – certainly at the front of the stage, and probably also midstage. However, it is often quite practical to consider the whole width of the rear of the stage as one area. This provides a seven area combination that offers an area palette giving the director considerable selectivity with the possibility of progressive tightening from back to front and from sides to middle.
C. Colour planning for a play:
In a naturalistic play, colour is often used to create a fluid atmosphere that can shift from warm cheerfulness to cool sadness. If an area is lit with some lights in warm tones and some in cools, the dimmers of the control board can be used to achieve a whole series of options from an extreme of the warm colour alone, through the neutrality of both together, to the other extreme of cool colour alone. Which (if any) of the areas need to have this kind of ‘double cover’ of colour tones? In this example, discussion with the director has established that such a colour palette seems necessary around the central areas and the desk, whereas the upstage corners and downstage right can manage on a warm tint only – although perhaps one that is a little closer to a compromise neutral than the warms in the mixable areas. In such a naturalistic production the actual colour tints chosen are likely to be quite subtle.

D. Colour planning for a musical:
The dialogue scenes of a musical require the subtle colour tones that are appropriate for a naturalistic play However, the musical numbers, particularly when solo singers can be given isolating visibility from tightly focused follow spots, usually call for strongly atmospheric colouring. And many dance sequences, where the body is relatively more expressive than the face, respond well to positive use of quite strong colour This example shows a much used technique where the colour is applied in rather broader washes than the areas selected for scene location. The front half of the stage is divided into three areas, each lit from above in rather saturated colours: a hot and cold rather than a warm and cool. The rear half is treated as one area, also with a hot and cold from above. From the side comes further washes, probably in slightly less saturated hues. These may divide the stage into bands: in this case an upstage band and a downstage band, possibly splitting the stage into left and right but just as likely covering the full width. With relatively neutral colour from the front, saturated colours from above and intermediate colours from the side, we have a colour palette that offers considerable scope.

5. THE DECISION PROCESS:
So how does one decide where to put the spotlights? On many stages and in many auditoria there is not much choice: but, to make the best use of the positions available, it is necessary to start from an ideal and compromise that ideal to fit reality. By WHERE, we mean where to put the light and where to point it.
Traditional advice involves a lot of crossing of light beams – partly to help model/sculpture the actor by introducing a partially side-light angle and partly because lighting diagonally across a stage provides a bigger spread of light from each lamp: an important bonus when equipment is in short supply. Crossing the beams opens out the area lit but can cast excessive shadows on side wall or masking. And so, with spotlights becoming increasingly versatile as to beam width, there is every reason to consider using the traditionally discredited method of lighting the actor with light coming straight in from the front. Of course if this is the only light, yes it will be flat. (And if the available positions are so low that an actor shadow will be thrown on to the sky, then better to come diagonally – priorities again!) But with the addition of some backlight (even if it is nearly vertical) and some sidelight, the front-lit actors will come alive and the areas/ shadows brought more under control. There need not be precise side lighting for every area: it can often be quite general since it is frequently more important in the big wide areas than in smaller tighter areas (more important, that is, in priority terms!).
In the examples shown here, the traditional crossing method has been used for the play, while the actors in the musical are lit’ flat frontal’. But it could be vice versa. Whichever way, the next stage in the planning is to establish where the lights go and where they point.
Example plan for a play

For each area of our play we need two lights. One for each side of the actors’ faces. When an area requires a full colour control of cool and warm, the number will double to four spots – a crossed pair in warm and a pair in cool. A spot bar immediately behind the proscenium arch will give a suitable angle for lighting the upstage areas, but for the downstage areas a position in the auditorium is necessary Red and blue have been used to indicate warm and cool filters in the spots. Green indicates more neutral washes that have been added from back and sides. Not enough equipment? Well, do we really need all these areas? And so many of them with both warm and cool? (Back to priorities?)
Or rather than a pair, we could use a single straight in – but if so, we must make it really straight in because a single crossing beam does not do much for the other side of the face!
Example plan for “In the Round”

or staging in the round, light needs to come from all sides. And it should be evenly balanced to avoid favouring one segment of audience to an extent that is not really permissible in a staging form so democratic as theatre-in-the-round. To avoid hitting into audience eyes, light has to come from both within the acting area and from outside it. Angles can be closer to the vertical than in other forms of staging because the audience is closer to the actors and thus visibility is ‘easier’.
Example plan for a musical

In this musical the actors’ visibility light is provided by spots in a neutral colour hitting straight in. The front areas are covered from the auditorium, the midstage areas from a bar just inside the proscenium, and the upstage areas from a midstage bar If the stage is very wide, two or more lamps may be required for each area as indicated. Strong colour comes from near vertical backlights and medium colour from the wings (on stands, booms or ladder-frames to be discussed under ‘rigging).
Note: For clarity these plans only include actor lights. The play would require light outside the window and on the door backings, while the musical is likely to need a colour mix for the backcloth and possibly specials for elements of scene.
6. DECIDING WHICH LIGHTS TO USE:
Deciding which instrument to use obviously depends to a large extent on what is available – meaning another exercise in listing priorities.
For ‘foh’ (front of house) throws of any distance in the auditorium, profiles are essential, both to avoid undesirable lighting up of the auditorium from scatter light, and to allow sufficiently precise control of the beam to prevent spillage on to the proscenium. However in a small hall there is a lot of merit in considering fresnels or PCs (well barndoored) at close range when a lot of spread is possible from a few lamps. For onstage use, Fresnels and PCs come into their own with fast-to-set soft edges – profiles are the most versatile instruments but they inevitably take longer to focus. For backlight, fresnels and beamlights are favourite, while floods are to be thought of only for wide expanses of scenery. (Use for actor light only in situations of extreme desperation). For theatre-in-the-round, barndoored fresnels give the required smoothness and spread. Existing installations in most theatres and halls are likely to be based on fresnels and profiles: anyone buying new equipment should look seriously at including a goodly proportion of the new generation PCs giving smooth soft-edge beams without stray scatter light and at the versatility of the variable beam profiles.

This plan shows instruments being allocated to our play in a very orthodox way: profiles for the front-of-house and fresnels for onstage. If a couple of PCs were available, they would be a useful alternative on the ends of the stage spot bar: this is a position where any scatter light shows up badly on the side walls of the set. Whether 500 or 1000W units are required will depend mainly on length of throw, perhaps with the changeover around 6 to 8 metres. However, it is important always to remember that the actual level of light intensity is not so important as the BALANCE.

Fresnels have been allocated everywhere because they have a good smooth spread (profile edges can be very difficult in small theatres in the round). Every spot must have a barndoor to contain spill from the audience eyes. Each become a pair of spots since this is the only way that it is possible to light fully to the sides of the acting area.
Too many-spots? Then perhaps just one cover in a neutral shade (thereby halving the number on the plan) and utilising a couple of pairs of straight downlighters to add colour toning in warm or cool.

The actor face lights are profiles from the front and fresnels onstage, with the second bar being less powerful units – face light is rarely important upstage in a musical. The backlights are fresnels, although parcans would be nice if available. For the sidelighting, profiles have been used downstage to contain the light in a tight corridor across the front – often advisable when front cloths or running tabs are in use. Midstage sidelighting use fresnels for a good spread, while the optional upstage sidelight again uses profiles to keep the light clear of the skycloth.
7. THE RIG PLAN:
The plan is the kernel of any lighting design. It shows, at minimum:
1. The POSITION of each light.
2. The TYPE of light in each position.
3. Any ACCESSORIES, such as barndoors or gobo, required by any particular light.
4. The DIMMER that will control each light.

The plan should be drawn to scale (1″ to 1 ‘ or 1:25). This helps accurate indication of light positions. And if scale symbols are used for these lights, there is a check on space problems: if it can be drawn on the plan, there will be room for it on the stage. Any shapes may be used to indicate lights, but plans are more easily read if the symbol resembles the outline shape of the light. Either way, the plan should certainly include a key showing the type of lighting instrument represented by each symbol. Colour and dimmer are indicated by number: the usual convention is to write the colour number inside the symbol and the dimmer number alongside the symbol.
Lights fixed to horizontal bars are easy to show in plan: the bar can be drawn in the position that it will occupy over the stage and its height indicated by a note (such as + 14’) written at the end of the bar. Lights fixed to vertical bars, or stacked on a series of brackets, are more difficult to draw – they must be indicated diagrammatically FOH lights in the auditorium are usually drawn much closer to the stage than their scaled real distance which would make the plan inconveniently large. The easiest method is to work on tracing paper over a ground plan of the scenery and stage.
A good procedure is:
1. Establish all lighting positions with Xs
2. Convert these Xs to symbols of available (and/or acquirable) lighting instrument types, drawing them pointing in the approximate direction of proposed light travel.
3. Write colour numbers inside symbols.
4. Add dimmer numbers alongside symbols.
5. Trace through key features of the set and stage – it is usually possible to trace through (in spaces clear of lighting drawing) enough to relate the positions of lights to the geography of the setting and stage.
This will bring the plan to a point where it can be used to prepare and rig the equipment. The lighting designer’s own copy will grow many extra markings to indicate precisely where the lights are to be pointed – markings so detailed that they would only confuse if included on all copies of the plan.
8. LISTS:
From the plan, lists are prepared of the required number of:
1. Types Of Light
2. Lengths Of Cable
3. Accessories
4. Colour Filters
5. Section Drawings

Will there be borders to mask the lights (and other things) hanging above the stage? If so, draw a section to check that all the light beams will be able to reach all desired parts of the actors and the scenery. Usually (but not always) the heights of the borders and lighting bars can be adjusted. Only a section will determine what these relative heights should be, and only a section will determine how effective the masking arrangements will be for an audience eye in the front row.
9. FOCUSING:
Focusing is probably the most important part of the whole lighting operation. Not even the most sophisticated marvel of a microprocessor control desk can fill in that dark spot where the lights have not been properly overlapped. Nor can a hard edge be softened or a disturbing spill on to a border be shuttered off. Focusing involves tricky ladder work so that there is every incentive to get it right first time – although, inevitably, it will be necessary to get at the odd spotlight between rehearsals for a little fine adjustment.
A. Focussing in comfort
If you stand with your back to the light that you are focusing, (I) You will avoid being blinded (2) You will be able to see what the actor’s light is doing to the scenery. Most profiles have an adjustment whereby the light can be adjusted so that it is either smooth across the whole spread of the beam, or ‘peaked’ to be brighter in the middle with the amount of light falling off towards the edge. For most purposes it is easier to light with an even brightness across the beam and so it is recommended that anyone beginning to work with light should use an even beam until through experience they discover a need for a ‘peaky’ beam.
 No clear shadow of head, therefore head is not lit.
 Clear shadow of head, therefore head is lit
 If the lighting designer is shorter than the actor, make an allowance – check by raising hand
10. TECHNICAL TERMS:
| GLOSSARYBacklight Light coming from behind scenery or actors to sculpt and separate them from their background.Bar Horizontal metal tube of scaffolding diameter for hanging lights (pipe in America)Barndoor Four-shutter rotatable device which slides into the front runners of fresnel and PC focus spots to shape the beam and reduce stray scatter light.Battens Lengths of overhead lighting floods arranged in 3 or 4 circuits for colour mixing. Beam angle Angle of the cone of Beamlight Lensless spotlight Board Contraction of switchboard or Boom Vertical pole, usually of Boom arm Bracket for fixing Build An increase in light intensity. Channel A control circuit, identified by Channel access The method (levers, Check Decrease in light intensity. Colour call A listing of all the Colour temperature A method Control Surface Any device such as Cross-fade Lighting change |
Cue The signal that initiates a change of any kind. Lighting cue is a change involving light intensity alterations.Cyclorama Plain cloth extending around and above the stage to give a feeling of infinite space. Term is often rather loosely used for any blue skycloth, either straight or with a limited curve at the ends.Dead (1) The plotted height of a piece of suspended scenery or bar of lights. (2) Discarded items of scenery.Dichroic Colour filters which work by reflecting unwanted parts of the spectrum rather than absorbing them in the manner of traditional filters.Diffuser A filter, often called a frost, which softens a light beam, particularly its edge. Dimmer Device which controls the Directional diffuser A filter Director Has the ultimate Discharge lamps Special high powered Downstage The part of the Ellipsoidal Strictly a type of Flood Simple instrument giving fixed Flys Area above the stage into Focusing Strictly speaking, the |
clearly defined image; but usually used to cover the whole process of adjusting the direction and beam of spotlights in which the desired image may be anything but clearly defined.FOH All instruments which are ‘front of house’, i.e. on the audience side of the proscenium.Follow spot Spotlight with which an operator follows actors around the stage.Fresnel spot Spotlight with soft edges due to fresnel lens which has a stepped moulding on the front and a textured surface on the back.Frost A diffuser filter used to soften a light beam. FUF Full-up-finish. An increase to Gate The optical centre of a profile Gauze Fabric which becomes Gobo A mask placed in the gate of a Groundrow A low piece of Group A subdivision, temporary or Hook clamp A clamp for fixing an Houselights The decorative Instrument A stage lighting unit, Iris An adjustable circular |
| Kilowatt see wattageLadder Framework in the shape of a ladder for hanging side lighting.Lamps The light source within an instrument, but sometimes used as an alternative to the word instrument.Lantern A lighting unit designed or adapted for stage use. A traditional word now being overtaken by ‘instrument’.Linear flood A flood using a long thin double-ended halogen lamp, allowing the reflector to be designed for an increased beam spread. Load The lights controlled by an Master A lever or push which Memory Lighting control systems Multiplexing Passing control Pan Horizontal (left/right) movement of Parcan The simple instrument which Par Lamp A sealed beam lamp with the P.C. [Plano convex] lens A lens |
Pipe ends Spotlights on the ends of lighting bars, crosslighting to model dancer’s bodies.Playback The part of a memory system where memorised lighting states are recalled to control the light on stage via master levers or pushes.Practical Light fitting which is not merely decorative but is wired to light up.Preset Anything which is positioned in advance of its being required –such as props placed on the stage before the performance. A control system where each channel has more than one lever to allow intensity levels to be set (i.e. preset) in advance of a cue.Profile Spot A spotlight which projects the outline (i.e. the profile) of any chosen shape and with any desired degree of hardness/softness. Profiled Cue Lighting change Rating The maximum and minimum Record Plotting a cue state by filing it Resistance dimmerAn older mechanical Rigger’s control A remote portable Scatter Low intensity light cast Scrollers Colour changer where a roll of Shin Busters Low level lights at |
Sightlines Lines drawn on plan and section to indicate limits of audience vision from extreme seats, including side seats, front and back rows, and seats in galleries.Silks Diffusion filters which stretch the light in a chosen direction.Spigot An adapter screwed to the hanging bolt of an instrument to enable it to be mounted on a floor stand.Spill stray or scatter light outside the main beam.Spotlight An instrument giving control of the angle of the emerging light beam and therefore of the size of area lit. Strobe Device giving a fast series of Theatre-in-the-Round A form of Throw Distance between a light and Thrust Form of stage which projects Tilt Vertical (up/down) movement of an Tungsten lamps Older type of lamps Tungsten halogen lamps Newer lamps Upstage The part of the stage UV Ultra violet light (from which |
|
Wattage The power of consumption of a lamp, or the maximum available power from a dimmer. A kilowatt is 1,000 watts. Ways The number of channels in a control system. |
Zoom A differential movement of two lenses in an optical system. In a< simple zoom, the lenses are moved independently, but in more complex forms a single movement alters the size of the beam while the image
|
remains in constant focus. Used in advanced profile spots and scene projectors.
|
